Two-way Google Calendar and Google Sheets Synchronization using Google Apps Script
Keeping track of time is crucial in project management and even more so when it comes to billing hours. Google Calendar is an excellent tool for organizing and scheduling, but it doesn’t provide an out-of-the-box solution for timesheet management. On the other hand, Google Sheets allows for easy tabulation and calculation but lacks the intuitive visual aspect of a calendar.
What if we could bring together the best of both worlds? In this post, we will do exactly that. We will guide you through creating a two-way sync between Google Calendar and Google Sheets using Google Apps Script.
This will enable employees to log their time spent on various tasks in a familiar calendar interface while automatically updating the project timesheet in Google Sheets. Managers can benefit from this approach by gaining a clear overview of project timelines, employee workloads, and overall time allocation.
Step 1: Prepare Your Google Sheet
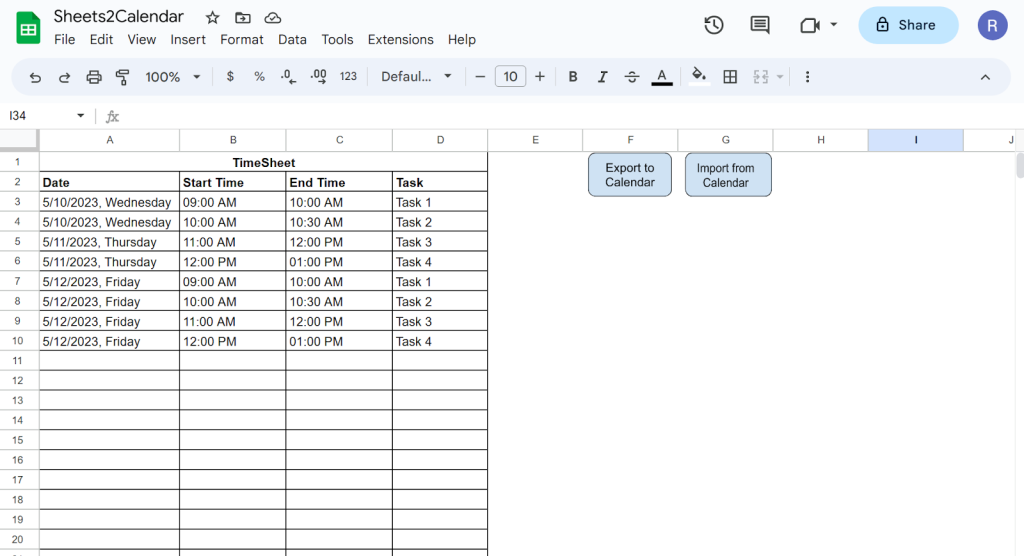
First, you need to set up your Google Sheet in the right format. The sheet should have the following columns: “Date“, “Start Time“, “End Time“, “Task“. Make sure “Date” is in the “YYYY-MM-DD” format and “Start Time” and “End Time” are in the “HH:MM” 24 hour format. Each row represents a single event.
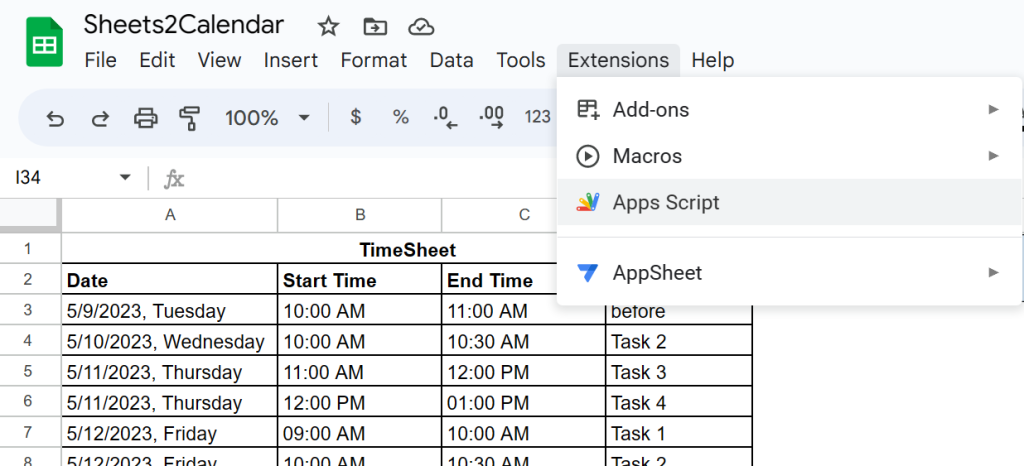
Step 2: Open Google Apps Script
From your Google Sheet, click on Extensions > Apps Script. This will open the Google Apps Script editor where you can write and manage your scripts.
Step 3: Write the Scripts
We’ll write two scripts: one to create calendar events from the sheet data (`createCalendarEvent`), and one to fetch calendar events and write them into the sheet (`fetchCalendarEvents`).
Here is the createCalendarEvent function:
// createCalendarEvent
function createCalendarEvent() {
  let communityCalendar = CalendarApp.getCalendarById("YOUR_CALENDAR_ID");
  let sheet = SpreadsheetApp.getActiveSheet();

  let schedule = sheet.getDataRange().getValues();
  schedule.splice(0, 2); // Remove header rows

  schedule.forEach(function(entry){
    let title = entry[3];
    let date = entry[0];
    let startTime = entry[1];
    let endTime = entry[2];

    let startDateTime = new Date(date.getFullYear(), date.getMonth(), date.getDate(), startTime.getHours(), startTime.getMinutes());
    let endDateTime = new Date(date.getFullYear(), date.getMonth(), date.getDate(), endTime.getHours(), endTime.getMinutes());

    let events = communityCalendar.getEvents(startDateTime, endDateTime);

    let isDuplicate = events.some(function(event) {
      return event.getTitle() === title;
    });

    if (!isDuplicate) {
      communityCalendar.createEvent(title, startDateTime, endDateTime);
    }
  });
}
And here is the fetchCalendarEvents function:
// fetchCalendarEvents
function fetchCalendarEvents() {
  let communityCalendar = CalendarApp.getCalendarById("YOUR_CALENDAR_ID");
  let sheet = SpreadsheetApp.getActiveSheet();

  sheet.getRange('A3:D').clearContent(); // Clear all rows starting from the third row

  let now = new Date();
  let events = communityCalendar.getEvents(new Date(now.getFullYear(), 0, 1), new Date(now.getFullYear() + 1, 0, 1));

  for (let i = 0; i < events.length; i++) {
    let startDateTime = events[i].getStartTime();
    let endDateTime = events[i].getEndTime();

    let startTime = Utilities.formatDate(startDateTime, Session.getScriptTimeZone(), 'HH:mm');
    let endTime = Utilities.formatDate(endDateTime, Session.getScriptTimeZone(), 'HH:mm');

    sheet.getRange(i + 3, 1).setValue(new Date(startDateTime.getFullYear(), startDateTime.getMonth(), startDateTime.getDate()));
    sheet.getRange(i + 3, 2).setValue(startTime);
    sheet.getRange(i + 3, 3).setValue(endTime);
    sheet.getRange(i + 3, 4).setValue(events[i].getTitle());
  }
}
Remember to replace “YOUR_CALENDAR_ID” with your own Google Calendar ID in both scripts.
Step 4: Save and Run the Scripts
After you’ve written the scripts, click on the floppy disk icon or File > Save to save your project. Give it a name like “Calendar-Sheet Sync”.
To run the scripts, select the function you want to run from the dropdown list next to the bug icon, then click the triangle ‘Run’ button. The first time you run the scripts, Google will ask for your permission to access your Google Calendar and Google Sheets. Click on ‘Review Permissions’, choose your account, and then click ‘Allow’.

Step 5: Test the Scripts
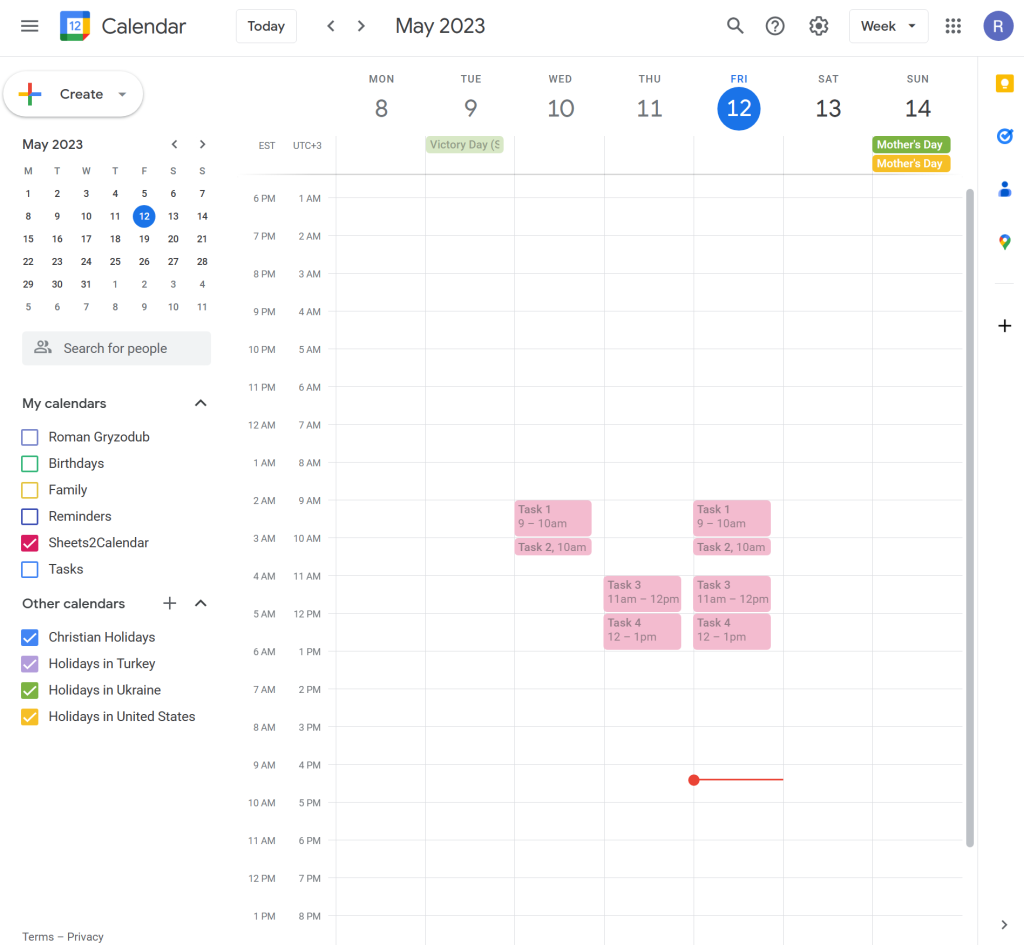
Try adding a few events to your Google Sheet and running the `createCalendarEvent` function. Then, check your Google Calendar to see if the events have been added.
Next, try adding some events directly to your Google Calendar. Run the `fetchCalendarEvents` function and check your Google Sheet. The events you added to the calendar should now appear in the sheet.
Step 6: Create Buttons for the Scripts
For easier access, you can create buttons in your Google Sheet that trigger the scripts when clicked. Here’s how to do it:
- On your Google Sheet, click on Insert > Drawing. Draw a shape (this will be your button). Click Save and Close when you’re done.
- Click on the drawing you just made, then click the three dots in the top right corner. Choose Assign Script.
- In the text box that appears, write the name of the function you want to assign to the button (createCalendarEvent or fetchCalendarEvents), then click OK.
- Repeat the process for the second function.
Now, whenever you click these buttons, the corresponding function will run. This is a handy way to manually sync your Google Sheet with your Google Calendar and vice versa without having to open Google Apps Script.